

How to fix Walk-in cooler door won't close
In the high-stakes environment of commercial kitchens, pharmaceutical storage, and industrial warehousing, the humble walk-in cooler door is the unsung hero. It is the primary barrier between your valuable inventory and the destructive forces of ambient heat and humidity.
But what happens when that barrier fails?
A walk-in cooler door that won't close—or won't stay closed—is a silent budget killer. It forces your refrigeration compressors to run continuously, driving electricity bills through the roof. It introduces moisture that turns into ice on your evaporator coils, leading to system freeze-ups. Worst of all, it compromises the temperature stability required by health codes, risking thousands of dollars in spoiled product.
If you are currently staring at a door that is bouncing back, dragging on the floor, or hanging crookedly, this guide is for you. We are going to move beyond the "kick it shut" method and dive deep into the mechanics, physics, and maintenance protocols required to restore your cooler door to perfect working order.
Part I: The Anatomy of a Closure Failure
To fix a door, you must understand the forces at play. A walk-in cooler door is not just a slab of metal; it is a precision-engineered system designed to combat gravity, air pressure, and thermal dynamics.
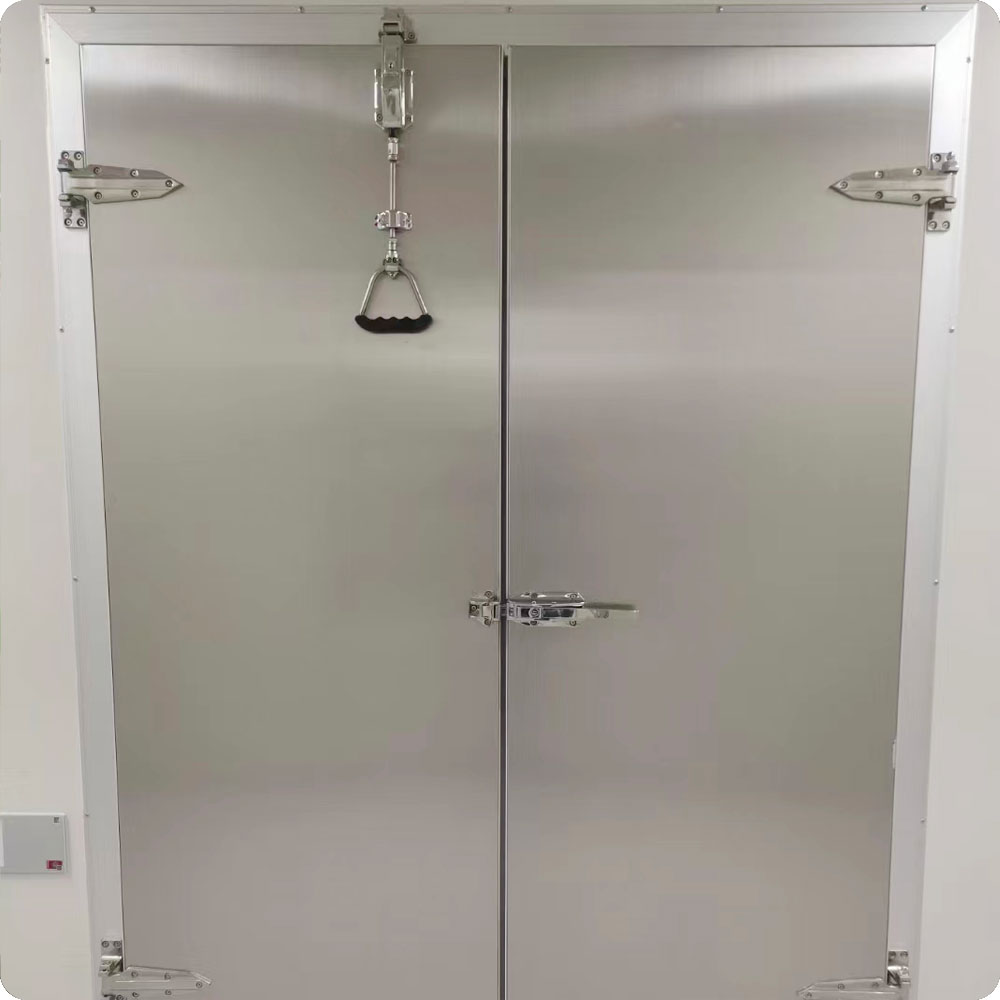
1. The Gravity System (Hinges)
Most modern walk-in swing doors use Cam-Lift Hinges. These are ingenious devices that use the door's own weight to close it. As you open the door, the hinge rides up a nylon or metal cam, physically lifting the door by about half an inch. When you let go, gravity pulls the door down the cam, swinging it shut with localized force. If the door won't close, gravity is often fighting against you rather than for you.
2. The Kinetic System (Door Closers)
Supplementing the hinges is the hydraulic or spring-loaded door closer. This is the piston-like device usually located at the top of the door. Its job is twofold: to pull the door into the latched position and to prevent it from slamming so hard that it bounces back open.
3. The Seal System (Gaskets & Sweeps)
The gasket is the flexible magnetic vinyl strip that runs around the perimeter. It creates an airtight seal. However, gaskets can become rigid, torn, or dislodged, transforming from a seal into an obstruction.
4. The Structural System (The Jamb)
The door hangs on a frame called the jamb. If the walk-in box shifts, settles, or if the floor heaves due to freezing ground moisture (frost heave), the square frame becomes a parallelogram. A rectangular door cannot close into a parallelogram frame.
Part II: Phase 1 — Diagnostic Triage
Before you pick up a screwdriver, you need to observe the failure mode. Stand back and watch the door attempt to close. Which of the following scenarios are you seeing?
Scenario A: The "Bounce Back"
The door swings shut with enthusiasm, hits the frame, and immediately pops back open a few inches.
-
Likely Culprit: Air pressure (negative pressure), a worn latch, or a closing speed that is too aggressive.
Scenario B: The "Drag and Stop"
The door moves slowly and scrapes against the floor or the threshold, stopping before it even reaches the latch.
-
Likely Culprit: Sagging hinges (door slump), loose hinge screws, or floor heave.
Scenario C: The "Gaping Maw"
The door closes and latches, but you can see visible light or feel a draft along the top or bottom corner. It’s closed, but it’s not sealed.
-
Likely Culprit: Warped door panel, twisted frame, or a severely damaged gasket.
Scenario D: The "Hard Stop"
The door hits something solid before it closes completely. It feels like it’s hitting a wall.
-
Likely Culprit: Ice buildup on the jamb, a shifted strike plate, or an obstruction in the hinge path.
Part III: Phase 2 — Detailed Troubleshooting & Repair
We will now break down the specific repairs based on the systems identified in Part I.
1. Hinge Failure: The #1 Cause of Door Sag
If your door is dragging on the floor opposite the hinge side, you have "Door Sag." This is the most common reason a walk-in door won't close.
The Diagnosis:
Look closely at the gap between the top of the door and the frame. Is the gap wider on the handle side than the hinge side? If so, the door is sagging.
Next, inspect the Cam-Lift Hinges. There is a small nylon cartridge (the cam) inside the hinge. Over years of use, this nylon wears down or flattens.
The Fix: Adjusting or Replacing Hinges
-
Tighten the Screws: It sounds obvious, but vibrations from compressors often loosen hinge screws. Check the mounting screws on both the door and the jamb. If they spin freely (stripped holes), you will need to use a "through-bolt" kit or fill the holes with specialized epoxy before re-drilling.
-
Shimming the Door:
-
Loosen the screws on the bottom hinge slightly.
-
Place a plastic shim (available at hardware stores) behind the hinge plate on the jamb side.
-
Tighten the screws. This pushes the bottom of the door out, lifting the handle side up.
-
-
Replacing the Cam Cartridge:
-
Note: You do not always need to replace the whole hinge. Many manufacturers (Kason, weak hardware, etc.) sell replacement cam kits.
-
Lift the door off: Open the door 90 degrees and lift it straight up off the hinge pins. (Warning: These doors are heavy—two people required).
-
Inspect the Cam: If the nylon cam inside the hinge is cracked or flat, pop it out and insert the new one.
-
Grease: Apply food-grade silicone grease to the new cam.
-
Re-hang: Drop the door back onto the pins. The door should now rise and fall smoothly as it opens.
-
2. The Hydraulic Closer: Tuning the Speed
If the door slams and bounces, or if it stops two inches short of the latch, your closer needs calibration.
The Diagnosis:
Disconnect the closer arm from the door. Does the door swing freely? If yes, the problem is the closer. If the closer is leaking oil, it is dead and must be replaced.
The Fix: Adjusting the Torque
Most hydraulic closers have two adjustment screws: Closing Speed (the main sweep) and Latching Speed (the final inch).
-
Locate the Screws: usually found on the end of the cylinder tube.
-
Adjust the Main Sweep: Turn the screw clockwise to slow the door down, counter-clockwise to speed it up. You want a brisk swing that doesn't endanger staff.
-
Adjust the Latch Speed: This controls the "snap" at the very end. If the door bounces back, the latch speed is too high. Slow it down so it gently engages the strike plate.
-
The "Hook" Geometry: Ensure the small hook that grabs the door is mounted correctly. If it is mounted too far back, the hydraulic arm runs out of travel before the door is fully closed.
3. The Gasket: The Silent Obstructor
A gasket is supposed to compress. When it gets old, it gets hard. A rock-hard gasket acts like a doorstop.
The Diagnosis:
-
The Dollar Bill Test: Close the door on a dollar bill. If you can pull it out easily, the gasket isn't sealing.
-
Visual Check: Look for "bunching" on the hinge side. Sometimes, a gasket slips out of its track and doubles over near the hinge, physically preventing the door from closing that last half-inch.
The Fix: Gasket Replacement
-
Identifying the Profile: Gaskets come in "Dart" style (pushes into a slot), "Screw-on" style, or "Glue-on." Pull back the corner of your old gasket to see how it attaches.
-
Removal: Pull the old gasket out. Clean the track thoroughly with a mild degreaser. Food acids and fats often build up here.
-
Installation: Start at the corners. Push the dart of the new gasket into the slot. Do not stretch the gasket as you install it; push it in towards the center. If you stretch it, it will shrink back later and leave gaps in the corners.
-
Heat Gun Trick: New gaskets come rolled up and twisted. Once installed, run a heat gun (on low) or a hair dryer over the gasket. This relaxes the vinyl, allowing it to conform to the door frame and create a perfect seal.
4. The Latch and Strike: Misalignment
The latch tongue (on the door) must line up perfectly with the strike assembly (on the jamb). If the door has sagged, the tongue will hit the strike plate low and fail to engage.
The Fix:
-
Adjust the Strike: most strike assemblies have slotted screw holes. Loosen the screws and slide the strike plate up or down to meet the latch.
-
Lubrication: The internal spring of the latch mechanism can rust. Spray a high-quality, low-temperature lubricant (like Super Lube) into the latch body. Do not use WD-40, as it can gum up in freezing temperatures.
-
Safety Release Check: While you are working on the latch, always test the inside safety release. Lock yourself (or a colleague) inside and ensure the plunger pushes the latch open. A broken safety release is a severe OSHA violation and a life-threatening hazard.
5. Ice Buildup: The Invisible Wedge
In freezers, humidity is your enemy. If warm air infiltrates, it condenses and freezes. Ice is incompressible. If ice builds up on the door jamb or the threshold, the door cannot close.
The Diagnosis:
Check the perimeter of the door frame. Is there ice? Check the threshold. Is there a mound of ice?
The Fix:
-
Immediate: Chip the ice away carefully with a plastic scraper (not metal, or you will damage the cladding).
-
Root Cause (Heater Wire): Walk-in freezer doors have a heater wire running under the jamb cladding to prevent this exact problem. Touch the jamb. It should be warm. If it is cold, the heater wire has failed or the circuit breaker has tripped.
-
Repair: Replacing a perimeter heater wire usually involves removing the metal cladding of the door frame. This is an advanced repair often requiring an electrician or refrigeration tech.
-
6. Air Pressure: The Physics of "Pop Open"
This is a subtle but common issue. When you close the door, you are pushing a large volume of air into the box. If the box is perfectly sealed, that air has nowhere to go, acting like a pneumatic piston that pushes the door back open.
Conversely, once the door is closed, the warm air you let in cools down and contracts, creating a vacuum that makes the door impossible to open again.
The Fix:
-
The Pressure Relief Port: Every walk-in must have a pressure relief port (usually a small heated vent on the wall).
-
Check the Vent: Locate the port. Is it blocked by boxes? Is the screen clogged with dust? Is the heater inside it working? If the vent is frozen shut, air pressure cannot equalize. Clear the obstruction or replace the vent mechanism.
Part IV: Preventive Maintenance — The "Forever Fix"
You have fixed the door. Now, how do you prevent this from happening next month? You need a maintenance schedule.
Weekly Checks
-
Wipe the Gaskets: Use hot soapy water. Animal fats and dairy acids destroy vinyl gaskets over time. Keeping them clean doubles their lifespan.
-
Clear the Threshold: Ensure no debris or ice is building up on the floor where the door sweeps.
Monthly Checks
-
Lubricate Hinges: Use food-grade silicone spray on the hinge cams and the roller of the latch.
-
Tighten Hardware: Take a screwdriver and check every screw on the hinges, closer, and latch. Vibration loosens everything.
Annual Checks
-
Level Check: Put a level on the door frame. If the building is settling, you may need to shim the entire door jamb to keep it square.
Part V: When to Call a Professional
While many of these fixes are DIY-friendly for a handy facility manager, some situations require a pro.
-
Structural Rot: If the wood backing inside the door or the frame is rotted (soft to the touch), screws will never hold. The door or frame needs replacement.
-
Electrical Heater Failure: If the heater wire is shorting out and tripping breakers, you are dealing with 115V or 230V electricity in a wet environment. Call an electrician.
-
Frame Distortion: If the cooler box itself has shifted significantly, forcing the door frame into a diamond shape, simply adjusting the hinges won't work. The panel walls may need to be reset.
Conclusion: A Closed Door is a Saved Dollar
A walk-in cooler door that closes swiftly and seals tightly is the hallmark of a well-run kitchen or facility. It indicates attention to detail, respect for food safety, and a commitment to energy efficiency.
Troubleshooting a door that won't close is a process of elimination. Is it gravity (hinges)? Is it friction (gaskets)? Is it obstruction (ice)? Or is it physics (air pressure)? By systematically isolating these variables, you can solve the problem effectively.
Don't ignore the bounce. Don't ignore the drift. Fix the door today, and your compressors (and your accountant) will thank you tomorrow.
Post time:Sep-25-2020
